What Is Add Your Own Product?
Add Your Own Product lets you replace any default Growbotik product with your own version. If your agency has an in-house team or a preferred vendor for a specific service, such as SEO, PPC, voice agents, or any other product in the platform, you can create a custom product that takes the place of the Growbotik system product in all future Growth Plans.
Your custom product keeps the system's analysis and planner logic intact. Growbotik continues to identify the need for that service during the Gap Analysis and includes it in the Growth Plan automatically, but the pricing, fulfillment, vendor, and reporting are all yours.
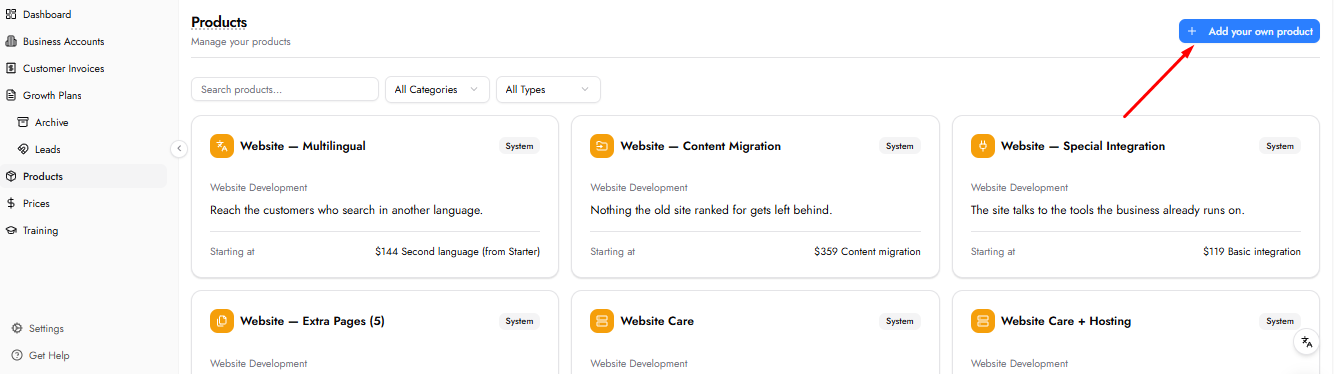
The Products section in the Partner Hub. The Add your own product button is in the top-right corner. Products in progress appear at the top of the page.
Why This Matters
Not every agency wants Growbotik to fulfill every service. You may have a specialized team, a proprietary process, or an existing vendor relationship that delivers better results for a particular product. Add Your Own Product gives you that flexibility without breaking the Growth Plan experience for your clients.
When you add your own product, Growbotik:
Keeps the existing analysis and planner logic — the product still appears in Growth Plans when the Gap Analysis identifies a need for it.
Uses your pricing model in plan budget projections.
Uses your projection assumptions (where applicable).
Creates a vendor profile for fulfillment.
Sends order notifications to your vendor emails.
Important: an added product creates a vendor-owned substitute. It cannot be fulfilled by the system vendor. You or your vendor are fully responsible for delivery.
How It Works
The setup is a 9-step wizard accessed from the Products section of the Partner Hub. Click the Add your own product button in the top-right corner to begin. Each step is described below.
Step 1 — Product Type
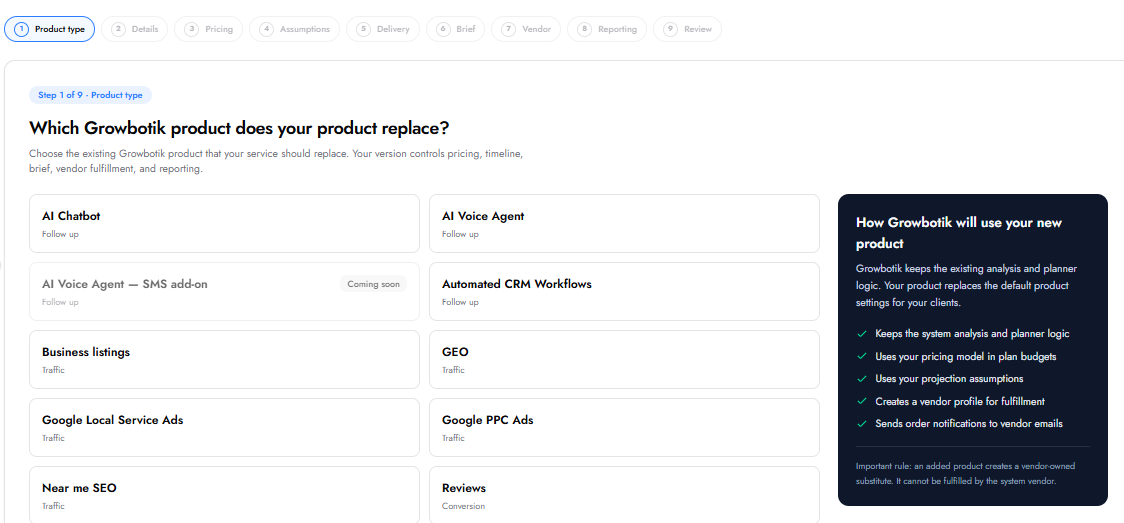
Choose which existing Growbotik product your product will replace. Only products that currently exist in the system can be replaced. Your custom product will appear in Growth Plans wherever the selected system product would have appeared.
The list shows each available product with its category. Some products may be marked as "Coming soon" and cannot be selected yet.
After selecting the product, click Continue.
Step 2 — Product Details
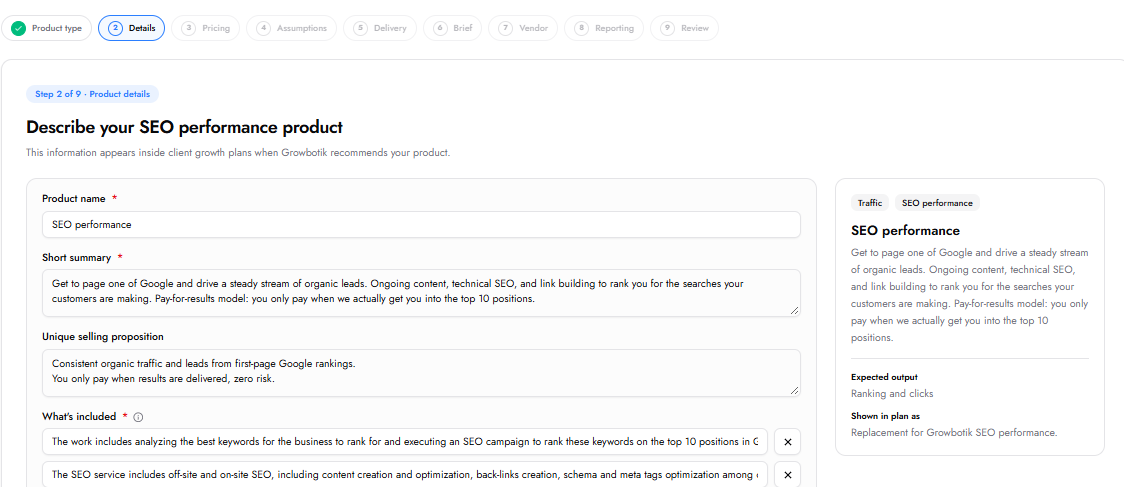
Describe your product. This information appears inside client Growth Plans when Growbotik recommends your product.
Product Name: The name of your product as it will appear in the system.
Short Summary: A brief description of what your product does. This is the main text clients see in the Growth Plan.
Unique Selling Proposition: The reason someone should buy this product — the core value statement.
What's Included: A list of features your product includes. Default features are pre-populated based on the system product you are replacing. You can edit, remove, or add features to match your actual offering.
Expected Output: The result your product is meant to achieve (e.g., lead capture, website traffic, ranking improvement).
A live preview on the right side of the page shows how your product will appear in the Growth Plan. Review it before continuing.
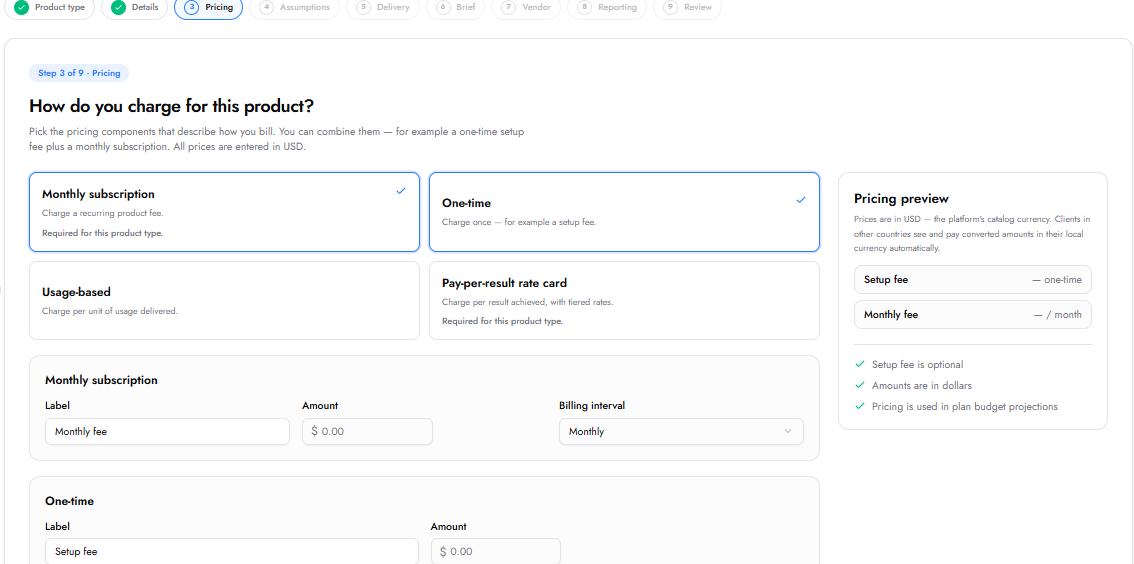
Step 3 — Pricing
Set the pricing model for your product. You can select one or more pricing components. All prices are entered in USD.
Monthly Subscription: A recurring fee charged every month. You set the label (e.g., "Monthly fee"), the amount, and the billing interval (monthly or yearly).
One-Time: A single charge — typically a setup fee. You set the label and the amount.
Usage-Based: A per-unit charge for usage delivered. You set the label and the amount per unit.
Pay-Per-Result Rate Card: A charge per result achieved, with tiered rates. This option is not available for all product types.
Select at least one pricing component so Growbotik can include your product in plan budget projections. Setup fees are optional. The Pricing Preview on the right side updates as you make selections.
Step 4 — Assumptions
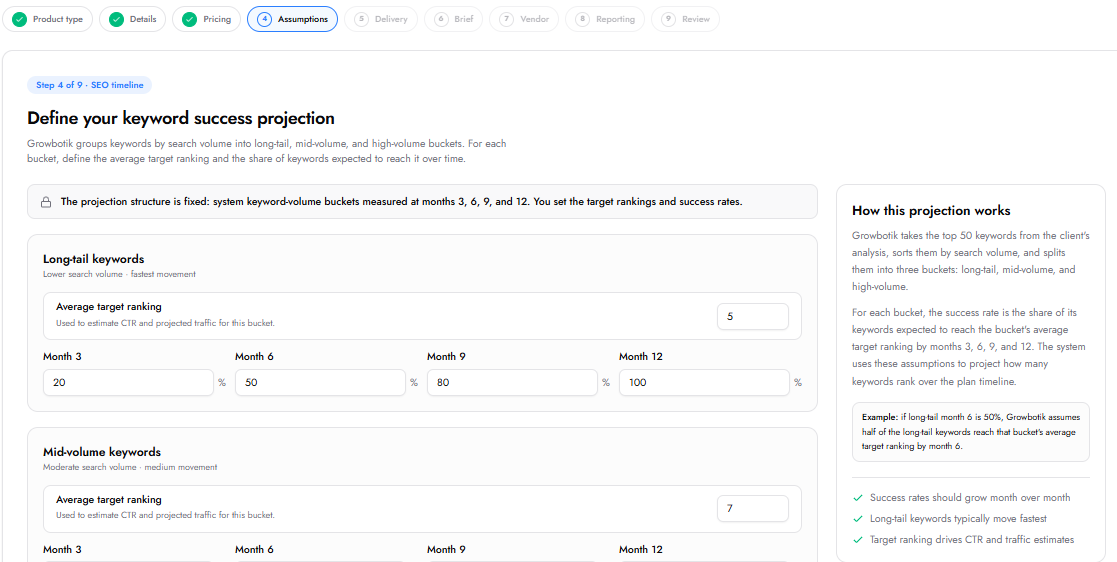
Configure the performance projections for your product. Growbotik uses these assumptions to estimate how much value the product will generate in the Growth Plan projections.
The assumptions available depend on the product type:
For Traffic products (e.g., Near Me SEO, Google PPC Ads), you can configure ramp-up percentages by month for main and secondary keyword categories.
For Follow Up products (e.g., AI Voice Agent, AI Chatbot), the projection model is owned by the system product. There are no vendor assumptions to configure — your product plugs into the same conversion model with your pricing and fulfillment.
The right panel explains why assumptions are or are not available for your selected product type.
Step 5 — Delivery
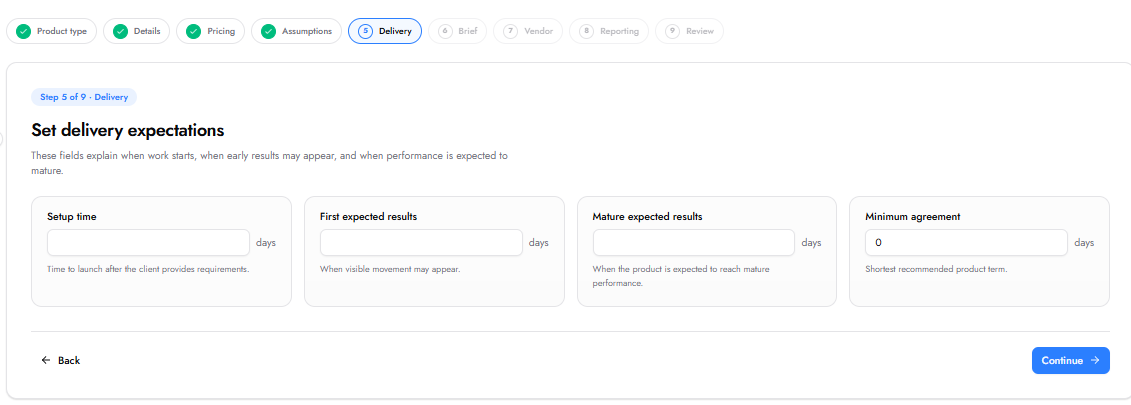
Set the delivery timeline for your product. These fields explain when work starts, when early results may appear, and when performance is expected to mature.
Setup Time: How many days it takes to launch the product after the client provides all required information.
First Expected Results: When visible movement may appear — the first signs of results, not full performance.
Mature Expected Results: When the product is expected to reach its full performance potential.
Minimum Agreement: The shortest recommended product term, in days. Set to 0 if you have no minimum.
Step 6 — Client Brief
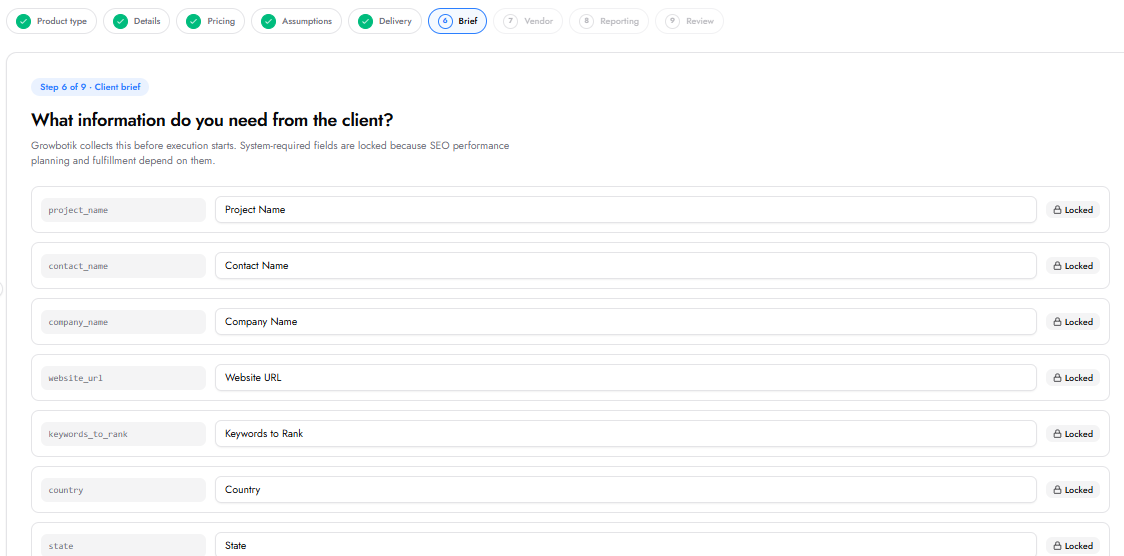
Define the information you need from the client before you can fulfill the product. When the product is purchased, the client sees a form in the To-Dos section of their Customer Hub containing these fields.
System-required fields are pre-populated and locked — they cannot be removed because the product's planning and fulfillment depend on them. The specific locked fields vary by product type.
Some fields are marked as Conditional, meaning they appear to the client only when certain conditions are met (e.g., a calendar API key field that appears only if the client selects a specific calendar tool).
If you need additional information not already listed, click Add custom field to create your own. Custom fields will appear in the client's To-Do form alongside the system fields.
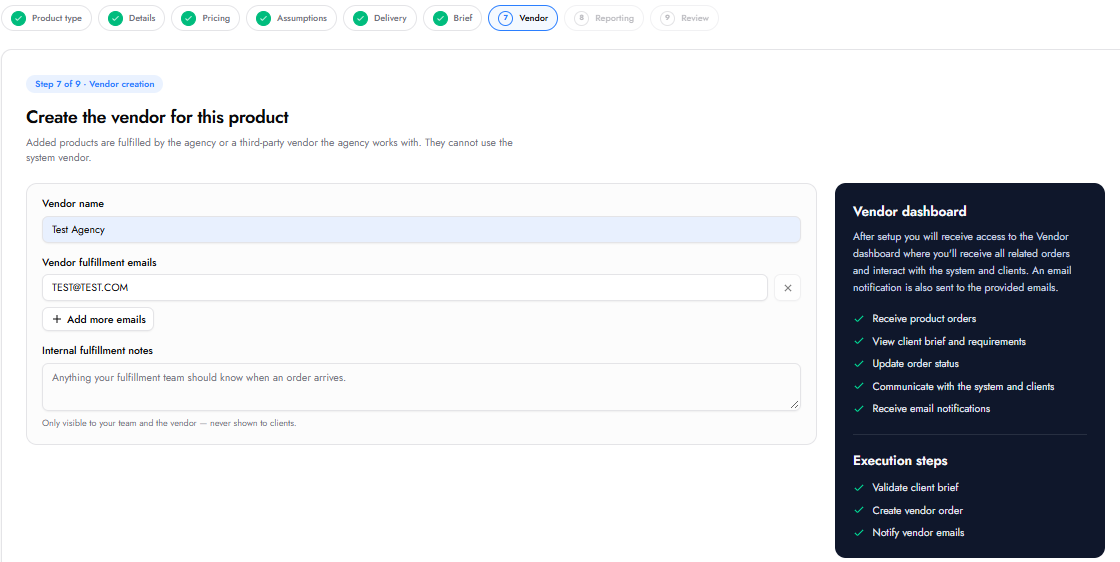
Step 7 — Vendor
Create the vendor profile for this product. Added products are fulfilled by your agency or a third-party vendor you work with. They cannot use the system vendor.
Vendor Name: The name of the fulfillment team or vendor.
Vendor Fulfillment Emails: The email addresses that receive all communications from the system — product orders, client brief details, and status update requests. You can add multiple emails if several people on the fulfillment team need to receive these updates.
Internal Fulfillment Notes: Any notes your fulfillment team should see every time an order arrives. This could be a reminder, a process step, or any instructions specific to how you want the product fulfilled. This information is only visible to your team and the vendor — clients never see it.
After setup, the vendor receives access to the Vendor Dashboard, where they can receive product orders, view client briefs and requirements, update order status, communicate with the system and clients, and receive email notifications.
Step 8 — Reporting
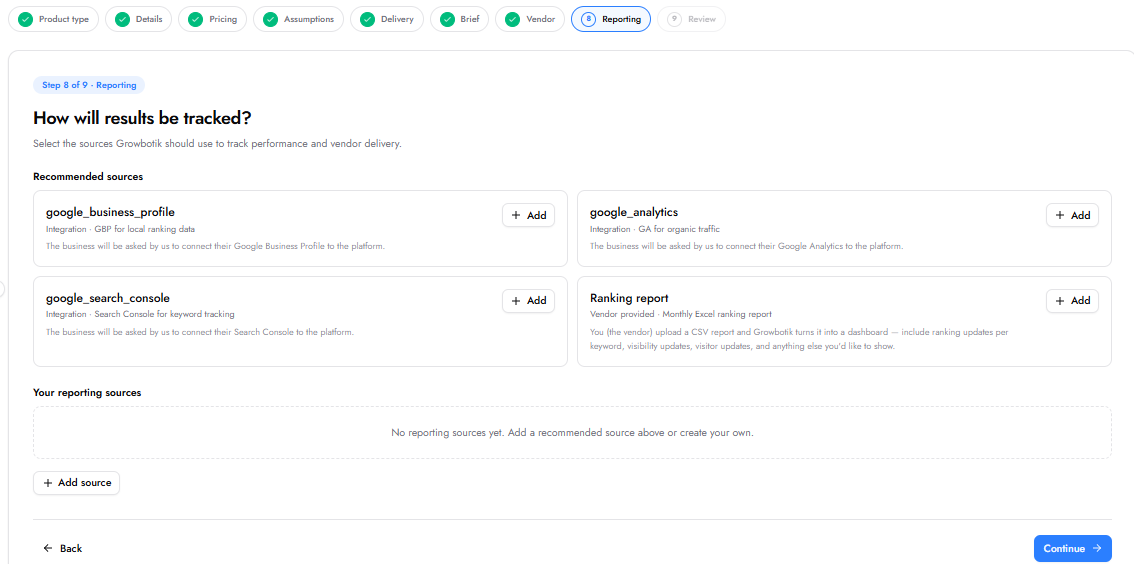
Select the sources Growbotik should use to track performance and vendor delivery. Recommended sources are shown based on the product type. You can add recommended sources by clicking Add, or create your own.
There are four types of reporting sources:
Vendor Provided: You upload a CSV report and Growbotik turns it into a dashboard. Include ranking updates per keyword, visibility updates, visitor updates, or anything else relevant.
Integration: A direct connection to a platform such as Google Analytics or Google Search Console.
API: Growbotik automatically pulls data from an endpoint you provide.
Manual: You or your team record results manually inside the platform.
You can add multiple reporting sources. Each source can be named and given optional details or instructions.
Step 9 — Review and Activate
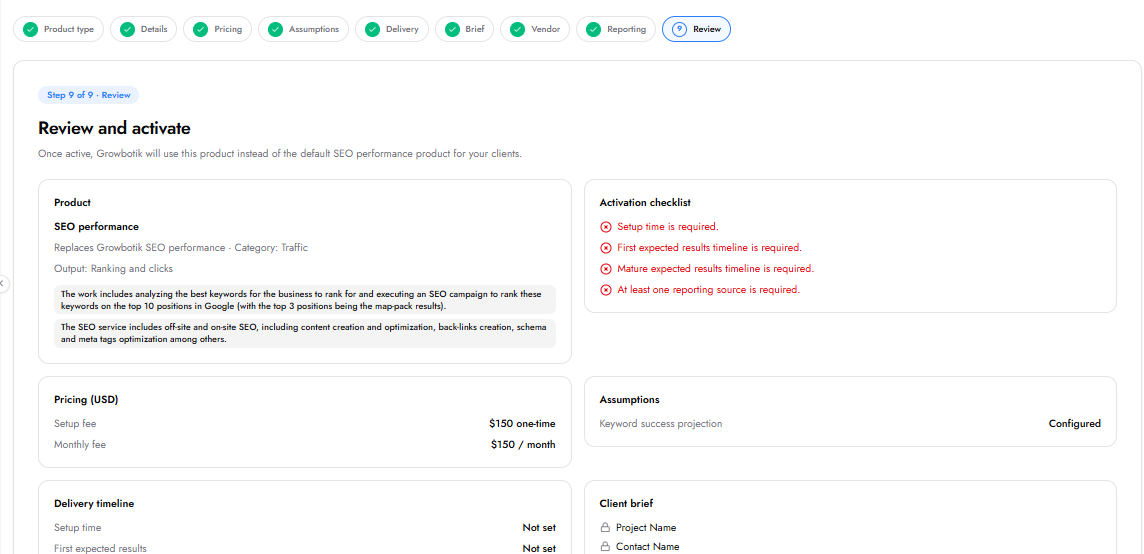
Review everything you have configured. This page displays a summary of all the information entered during the setup process:
Product info — name, category, description, features, and expected output.
Pricing — all pricing components and amounts.
Assumptions — whether custom assumptions are configured or the system defaults are used.
Delivery timeline — setup time, first results, mature results, and minimum agreement.
Client brief — all fields the client will complete.
Vendor — name, emails, fulfillment notes, and execution steps.
Reporting — all configured reporting sources.
The Activation Checklist on the right confirms whether everything is ready. If anything was missed or filled out incorrectly, it will be flagged here. You can click any section in the top navigation bar to go back and make changes.
You have two options:
Save as Draft: Saves all progress without activating. You can return and finish later. Draft products appear in the "Your products in progress" section at the top of the Products page.
Activate Product: Makes the product live. Once active, Growbotik uses your product instead of the default system product when creating Growth Plans for your clients.
What Happens After Activation
Your custom product appears in the Products section marked as Custom instead of System.
Whenever a client goes through Discovery and Analysis and receives a Growth Plan, your product is used in place of the system product it replaced.
When a client purchases a Growth Plan containing your product, the vendor receives the execution instructions — the client brief, order details, and any fulfillment notes you configured.
The execution flow is: Validate client brief → Create vendor order → Notify vendor emails.
You can add more custom products at any time by repeating the process for a different system product.
Managing Your Products
After activation, your custom products are listed alongside system products on the Products page. System products are labeled System. Your products are labeled Custom.
Products saved as drafts appear in the "Your products in progress" section at the top of the Products page, with a Continue Setup button to resume the wizard where you left off. You can also delete a draft from that section.
Frequently Asked Questions
Can I replace more than one system product?
Yes. You can add as many custom products as you need, each replacing a different system product. Complete the wizard once per product.
What if some assumption fields are not available for my product?
Assumption availability depends on the product type. For some categories, the projection model is owned by the system product and there are no vendor assumptions to configure. Your product plugs into the same model with your own pricing and fulfillment. The wizard explains this on the Assumptions step for the specific product you selected.
Do I have to fill in all pricing components?
No. You must select at least one pricing component, but you can choose any combination that fits your pricing model. For example, you can set just a monthly subscription, or combine a monthly fee with a one-time setup fee and a usage-based component.
What does the client see when my product is in their Growth Plan?
The client sees the product name, short summary, features, expected output, and pricing that you configured in the Details and Pricing steps. When they purchase the plan and the product requires a To-Do, they complete the client brief form you defined in Step 6.
Who fulfills the product?
You or your vendor. Added products cannot be fulfilled by the system vendor. The vendor you create in Step 7 receives all order notifications, client briefs, and fulfillment communications through the Vendor Dashboard.